 Something internal. We could have used sourceforge but not all of our software is open source. We wanted something where we held the keys.
Setting up Concurrent Source Code Management using CVS & Win CVS
Dedication: To Penguin. She knows who she is :)
Quote: Nescire quaedam magna pars sapientiae est.
Greetings demo sceners! Now that the summer draws to a close, I hope this article finds you in good health and that you are nestling in for a productive demo coding winter to make lots of juicy prods to release in summer! :) To help you along the way, this article discusses Concurrent Version Systems. I'll start with discussing the need of a concurrent version system, describe what they provide for us and then illustrate a relatively cheap way for you to implement your own concurrent version system.
Why use a Concurrent Version System?
As demo productions grow larger and more complicated; it's more and more important to work well together as a team. To build a cutting edge demo - you need lots of talented people working together simultaneously. Some projects will have several artists, coders and musicians. Artwork and music tend to be "single threaded operations", meaning each artist is working on one piece of the puzzle. To make use of more artists or musicians, you simply give more artists more individual pieces of the puzzle.
Code however, tends to be harder to split apart sometimes. You can build frameworks that enable coders to "work on one piece of the puzzle".. But what if you first project is that framework? What if you discover a bug and would like to fix it; but that code isn't part of your puzzle? What if the puzzle pieces don't fit... or if they did fit - what happens if someone changes something and the puzzle becomes broken? You can imagine this like having multiple artists... where each one is working on a the same painting... but they can't see what the other artist is doing. Things can get messy fast!
Concurrent Version Systems take the blinders off of the coder, enabling them to see what the other coders are doing, as well as helping to prevent people from "falling over each other" as they modify source code. There are several version control systems on the market. You can see more information about various source code version tools on the web. A good place to start is with this google directiory:
http://directory.google.com/Top/Computers/Software/Configuration_Management/Tools
What is CVS?
CVS is a popular (open source) concurrent version system. CVS supports lots of variants, as well as extensions. For example, WinCVS gives a gui front end to CVS. Tortoise for CVS plugs into the windows explorer to give CVS functions inside the tool. The original CVS started as shell scripts written in 1986 by Dick Grune. No code from these shell scripts is in CVS but the CVS conflict resolution algorithms come from them. In 1989 Brian Berliner coded CVS and things grew from there.
What is nice about CVS - is that it is open source and commonly used. The support and number of tools available to add on to CVS is growing all the time. CVS is a very powerful tool, which can make it confusing for people new to it. In the remainder of this document, I detail how we deployed CVS in my demo group "The Northern Dragons", and how you can do something similar.
Our Specific CVS Implementation Requirements
The Northern Dragons is a distributed demo group, with members across North America and the world. We are a non-profit group, funding our demo coding addiction ourselves. As we grow in size (we are still looking for more artists and modelers!), we've developed more and more technology to help us work together. For a version control system; I needed something that could be accessed anywhere, anytime; and run without much expense. Our requirements were as follows.
Something internal. We could have used sourceforge but not all of our software is open source. We wanted something where we held the keys.
Something external. While we wanted to hold the keys and to be able to manage our own CVS... we also wanted to be able to keep our hands off of it if possible. While I could have setup and run a CVS server out of my own home, there are some challenges with that. For example, I would have to keep up on security patches all the time, take care of power (and power redundancy if possible), and ensure adequate backups. Yes, short cuts are possible; but there is still a lot of effort required in running your own server.
Something cheap! When you are paying for things out of your own pocket, you will certainly be looking for the best value for your dollar!
Something "reasonably" secure. I mean that not only in the sense of server security, but also source code security. It would disturb me if source code was being downloaded / uploaded in plain ASCII text. I am much more comfortable with data being encrypted if possible.
Our CVS Implementation (Overview)
The first two requirements meant that we had to find somewhere I could host a version control software package. There are some version control vendors on the Internet that provide these services, but I was interested in finding a cost-effective solution. In the end I determined that it would be easiest to find something that ran over a basic hosting services package. Competition in the arena drives costs down and you actually get a lot of value that you couldn't afford just on your own.
These services can include a dedicated backup infrastructure, a sysadmin to monitor and deploy os level patches, redundant network capabilities, and or offsite power and storage. It essence, the system runs along in the background leaving you to worry about the code - rather than the server. To pay for these features as an individual would be very costly, but as a client on a shared system - you can run it on as little as 50$ USD. A good search tool for finding hosting providers is http://www.hostsearch.com/.
The challenge of course, is taking these limited packages and getting a working version system onto it. Most packages give you web access, ftp access, and some kind of terminal - either ssh or telnet. This means that you need to find a solution that can use these ports; rather than listing on something that you might not have access to. We ended up finding that we could get CVS to run over the ssh. We also found a version that runs well under linux.
Implementation (Server Deploy)
Step #1 - Obtain CVS
The first step is finding the CVS binary. You may be lucky and actually have CVS already on the server ready to use. To determine this simply enter "cvs -version". If it's installed you might see something that looks like this:
cvs -version

Concurrent Versions System (CVS) 1.11.1p1 (client/server)

Copyright (c) 1989-2001 Brian Berliner, david d `zoo' zuhn,

Jeff Polk, and other authors

CVS may be copied only under the terms of the GNU General Public License,

a copy of which can be found with the CVS distribution kit.

Specify the --help option for further information about CVS
If not, don't despair. Grab the latest CVS from http://www.cvshome.org/. You will find when you go to the site, that there are several packages available. For the purposes of this article I downloaded CVS-1.11.tar.gz, and uploaded it to my hosting account.
Step #2 - Build the CVS executable
Most hosting providers have the default linux package, which includes gcc for compiling code. This process allows you to build the CVS executable. Try to ensure when you pick a hosting provider - that you have access to a C compiler; or it will be hard for you to generate the required CVS executable. I found it very difficult to find pre-built CVS executables for linux.
After obtaining the source file, I uploaded it to the hosting account. I decompressed it by issuing the command "gunzip cvs-1.11.tar.gz" - which gave me the file cvs-1.11.tar. Afterwards, I expanded the tar file with "tar -xvf cvs-1.11.tar". This created the default folder /myhomedir/cvs-1.11. The next step is to read the CVS readme file for any important info. ("more README"), and the install notes (called "INSTALL").
After reviewing, I determined that I needed some place to store the CVS binary. Since my hosting provider works out of home directories I created a directory as /home/yourhostingaccount/cvsbin. Substitute yourhostingaccount for your own hosting account path - whatever that might be! (I'll use that convention throughout the rest of this document). After creating the directory; I ran the configure tool to point it to the right place. (as follows)
./configure --prefix=/home/yourhostingaccount/cvsbin
This generates options.h - which is used in the compilation of the code. You should see a lot scroll by when you are running the configure. It goes in two phases - checking and then creating. Once the options are set, we run the default make file. This is done by issuing the command "make". This compiles the source code. After the initial make, run - "make install". This creates the final binary executables in /home/yourhostingaccount/cvsbin/bin. Now that the CVS executable has been generated - the source no longer has to stay around. I deleted the source with a "rm -Rf /home/yourhostingaccount/cvs-1.11/"
Step #3 - Creating a new Repository
Once the CVS binary has been generated, it's time to create a repository. This is done with our new CVS executable. I created it as follows:
/home/ yourhostingaccount/cvsbin/bin/cvs -d /home/yourhostingaccount/cvsroot init
CVS can be quite verbose (I'm kidding). If everything worked - it will simply give you your command prompt back. No messages at all.
Initial Client Configuration
For client configuration, I used wincvs over ssh. It's possible to use lots of other configurations - just use this as a bit of a template. The first step I performed was to install TCL/TLK 8.2.3 for windows. This gives wincvs support for some of it's macros. The package [tcl823.exe] can be downloaded from www.tcl.tk. I installed it with only the run time - there is little requirement of the example scripts or the help files unless you are planing to pickup tcl as well.
The second step of client configuration is to configure SSH. I use the console based ssh 1 package - ssh-1_2_14-win32bin.zip. These can be downloaded from many places (just search) or from arl.stanford.edu.
I should note that one of our Northern Dragons members prefers to use putty - I'll include some notes later on how to do that. For our purposes - I extracted the ssh package to C:\ssh. Once the files are extracted - you need to setup some environment variables.
For Windows nt/w2k/xp, Right click on "My computer" and select properties. Selecting the advanced tab will let you get to Environment Variables. Modify your Path system variable to include C:\SSH (or wherever you installed it). Add the system variable home and set it to the path of ssh (home=C:\ssh).
For windows 95/98/or ME you will have to add lines to your autoexec bat file. This appears as follows: (note path is designed to add what ever else was already set in your path.. so add these lines at the bottom of the file). [After this you may need to reboot for these changes to take effect.]
SET HOME=C:\HOME

SET PATH=%PATH%;C:\SSH
Now that SSH is deployed, you should test it. Open a command prompt and run a simple test:
ssh -l hosting_account serverhostname
It should ask you about the a password - this is the password you use to access your hosting account. Once you have a shell open - you can exit by typing exit.
WinCVS will use the ssh package to tunnel into your server. To do this, we need to setup authorized keys to allow for access that doesn't prompt for passwords. These are used by using generating private keys and public keys. To generate your keys run in a console window:
cd \ssh
ssh-keygen -C
* Note - user name does not have to be anything specific. Because multiple people are potentially accessing the server (and if not - what's the point?)... I would suggest using your group nicknames. For example: ssh-keygen -C polaris -f ./.ssh/identity
The keygen program will ask for passwords. Do not enter a passphrase, or password-less access will not work. If all goes well, it should appear as follows:
Initializing random number generator...

Generating p: ................................................++ (distance 782)

Generating q: ...........++ (distance 166)

Computing the keys...

Testing the keys...

Key generation complete.

Enter passphrase (empty for no passphrase):

Enter same passphrase again:

Your identification has been saved in ./.ssh/identity.

Your public key is:

1024 35 012345678901234567890012345678900123456789001234567890012345678900123456

01234567890012345678900123456789001234567890012345678900123456789001234567890012

01234567890012345678900123456789001234567890012345678900123456789001234567890012

0123456789001234567890012345678900123456789001234567890012345678900123456789 pol

aris

Your public key has been saved in ./.ssh/identity.pub
Server and Client Configuration with Ssh keys
Now that you've generated a public key, and a private key - you need to add the public key to your server's keys. You will notice that the public key is essentially ASCII. Because the whole idea of this is having multiple people accessing your server - you will want to append the authorized key file rather than over writing it. For example - you can do something like this:
ftp ftp.yourserver.com

put identity.pub


ssh yourserverhostname.com

cat identity.pub >> ~/.ssh/authorized_keys

chmod go-rwx ~/.ssh/authorized_keys
* You will notice the chmod ensures that the authorized file can not be written after the append is performed - you may need open up the file permissions to append it first. This is the best way to help prevent your authorized_key file from being hacked.
Depending on your installation - you may want to automate this process. For example, you could design a perl script that ran on your server and allowed members to upload their keys to the server. Make sure you secure your site if you are going to do this! The following simple perl [uploadkey.pl] script can be used:
#!/usr/bin/perl

use CGI;

my $cgi = new CGI;

my $file = $cgi->param('file');

$file=~m/^.*(\\|\/)(.*)/; # strip the remote path and keep the filename

my $name = $2;

open(LOCAL, ">>/home/ yourhostingaccount /.ssh/authorized_keys") or die $!;

while(<$file>) {

print LOCAL $_;

}

print "Content-type: text/html\n\n";

print "$file has been successfully uploaded and imported into the servers keys.\n You now have access to the code repository over ssh.";
The following HTML can be used with the perl script:
<FORM ENCTYPE="multipart/form-data" ACTION="uploadkey.pl" METHOD="POST">

Please select the key to upload: <BR> <INPUT TYPE="FILE" NAME="file"> <p>

<INPUT TYPE="submit" value="Submit Key">

</FORM>
At this point - your client should be able to connect to the server without being prompted for a password, as it has your public_key. To test:
ssh -l yourhostingaccountid yourserverhostname.com
You should not be prompted for a password. If you are - repeat the steps to generate your key and get it to the server. You might at this point be asking - hey! I'm giving my demo coding group shell access to the hosting account without a password? Yup. That's right; guess you just have to trust them. One nice thing however - you've never given them the password. So at least you will still be able to get into the system even if one of your group members does something weird.
Step #4b & #5b - Using putty instead of SSH1
One of our members likes to use putty instead of SSH1. Here are his notes:
1. Run c:\putty\puttygen to generate your SSH1 private and public keys. Enter a passphrase, click save to save both the private and public keys.
2. Upload append your public key file.
3. Run c:\putty\pageant, click Add Key, select your private key file, enter the passphrase. Leave pageant running.
4. Test your connection by running "c:\putty\plink.exe -v yourhostingid@hostingserver.com echo Testing". If all is well you should see "Testing" printed to the console with a status 0.
Step #6 - Win CVS client configuration for SSH1 Package / Putty
(Final Client Configuration)
At this point, ssh is setup, and you can get wincvs working with it! We are almost home free! The next step is to install wincvs with it's defaults. You can get wincvs from http://prdownloads.sourceforge.net/cvsgui/WinCvs120.zip. Install with the defaults.
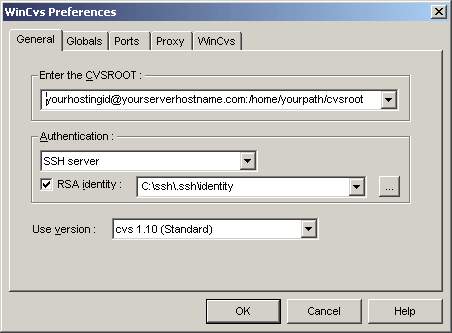
Once CVS is installed, you need to configure it. This is done by starting wincvs and then selecting admin / preferences from the menu. From there, you configure the CVS root. The CVS root is set to the following:
yourhostingaccountID@yourserverhostname.com:/home/yourpath/cvsroot.
Ensure you select SSH Server for Authentication - and point your RSA identity to the identity file (your private key) in c:\ssh\.ssh\identity.
Now, you will require one more step - since we compiled the binaries as CVS - the server will expect to be able to access them by just entering "cvs". This might not be the case - we should tell it explicitly where to find the CVS binary.
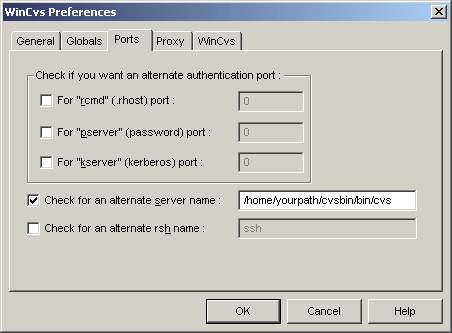
This is done on the ports view of CVS. (Check out the screen shot as well). Select "check for an alternate server name" and provide the path to your CVS binary that you compiled:
/home/yourpath/cvsbin/bin/cvs
For use with Putty:
You need to point it to the putty ssh product. The key - is you click the "Settings" button next to the "authentication: ssh" selection you just made and check "SSH client" and enter "c:\putty\plink.exe".
So... What's next?
Well congratulations! You've been successful in deploying CVS! CVS is a complicated product, and but there is some documentation on how to use it. The easiest starting documentation is the WinCvs Version 1.1 Users Guide. Be sure to read the last section - about editing the modules administrative file... it will let your users see the modules they can check out via / "Admin / Macros Admin / List Modules on Server".
Test out the wheels! Import your projects etc! :) Start using CVS! And enjoy the benefits of concurrent version management!